Documentation – Development
Introduction
Proteomatic scripts may be implemented in one of the supported scripting languages:
- Ruby
- Python
- PHP
More scripting languages can be implemented, but operating system independent and lightweight languages are strongly preferred to retain overall platform independence and ease of use.
Script types
In an attempt to unify the usage of scripts, two usage patterns have been defined. Each self-describing script must conform to either the processor or converter pattern.
Processor scripts
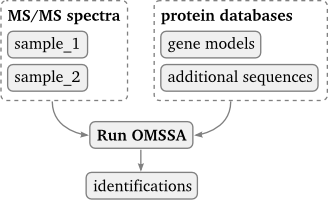
Processor scripts may define an arbitrary amount of input file groups with varying minimum--help. In the GUI, additional input group proxy boxes are created which input files must be connected to.
The processor usage pattern allows for an arbitrary amount of input files, but there is a fixed set of output files, each of which can be enabled or disabled. Note that input files and output files are optional in this usage pattern.
Converter scripts
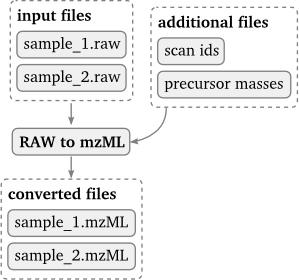
The converter usage pattern allows for an arbitrary amount of input file groups. One input group is defined as the converter input group and every file in this group gets converted. This means that the number of output files is equal to the number of input files in the converter input group. Additional input files in other input groups may be defined which can be used for the conversion but will not be converted themselves.
Implementing scripts
Every Proteomatic script consists of two distinct parts:
- a description containing detailed information about parameters and input and output files
- the actual implementation, in any of the supported scripting languages
The description is implicitly linked to the implementation via its filename and is independent of the scripting language used.
The script description
The script description is a YAML-formatted document and must be placed in the include/properties directory. Using a ‘tidy up’ script as an example, the script description would be saved in include/properties/tidy-up.yaml (the purpose of this script is purely demonstration):
title: Tidy up

group: Miscellaneous/Word processing

type: processor

description: >
  Tidy up a string by sorting all letters
  and placing them neatly next to each other.

parameters:
  - key: text
    label: Text
    type: string
    default: 'Hello, fellow!'
Please note that tabs are not allowed in YAML files. Apart from that the format is really easy to learn. The individual keys defined above are:
- title
The script title should be short and descriptive. It is displayed to the user in the GUI and on the website.
- group
Use the group to specify a menu path in the scripts menu. In this example, a top-level menu ‘Miscellaneous’ would be created, and in it, a sub-menu called ‘Word processing’, which would finally contain the script.
- type
One of the two script types, processor or converter.
- description
Describe what the script does in a very concise way here. Start with an active verb like ‘Tidy up’. Do not say ‘Tidies up…’ or ‘This script tidies up…’.
If you have more than one sentence, place the first sentence and each following paragraph in <p> … </p> tags, but make sure that the description does not become too long. For additional documentation, you can use a documentation file (which in this example would be calledinclude/documentation/tidy-up.html).
Parameters
If your script has parameters, place them here, in the order you want them to appear.
- key
The parameter key is used to set the parameter on the command-line level. For example, the
textparameter would be specified like this:-text "Hello, fellow". Use lower camel case for parameter keys, for exampleparseMode.
- label
The label represents the parameter in a human-readable way. Use proper capitalization here.
- type
The following parameter types are available:
string: A character string.
This type has specific options:textfield: yes— show a text field in the GUI, allowing the user to enter more than a single line of text.examples: [string list]— provides examples to the user via an editable drop-down box in the GUI.
int: An integer.
This type has specific options:min: [number]— the smallest number allowedmax: [number]— the highest number allowedsuffix: [string]— a suffix which is displayed after the number
float: A floating point number.
This type has specific options:min: [number]— the smallest number allowedmax: [number]— the highest number allowedsuffix: [string]— a suffix which is displayed after the numberdecimals: [number]— the number of decimals displayed in the GUI
enum: Creates a drop-down box in the GUI, presenting multiple choices to user.
Requires the definition of the possible values:choices: [list of choices]— each entry in the list can either be a string (in which case key and label are equal) or a dictionary with a single key/value entry, where the value is used as the label.
Example:
In this example, the parameters would be specified with single words on the command line but the GUI would present the verbose representation of the ‘infinite’ choice to the user.parameters: - key: loop label: Number of loops type: enum choices: ['one', 'many', {'infinite': 'Infinite - this is insane!'}]
csvString: The same asenum, but with multiple choices possible (including no choice at all). The chosen parameters are specified as a string composed of comma-separated keys.bool: A boolean value (true or false). You may also useflagas a synonym.
- default
If you don’t specify a default value for your parameter, sensible default values will be chosen automatically (empty strings and zeros, false for bools/flags, the first choice for enums, no choice for csvStrings).
In addition, the following keys are possible for parameters:
- description
Describe the parameter if it is not obvious. This description will be shown on the website and, in the GUI, in a tool tip when the user hovers over the parameter.
Input files
In addition to parameters, input files may be specified. An example of this is the Check MD5 sums script which takes a number of input files and creates an overall MD5 checksum. This is the description (include/properties/md5sum.yaml):
group: Miscellaneous

title: Check MD5 sums

description: >
  <p>
  Determine the MD5 sum of a set of input files.
  </p>
  <p>
  All input files are sorted by filename (regardless of their directory) and
  concatenated for the MD5 creation. This is done to ensure equal MD5 checksums
  for equal sets of input files, regardless of the order the files are specified in.
  </p>

type: processor

input:
  - key: files
    label: input
    min: 1
    formats: [any]

parameters:
  - key: assertMd5
    type: string
    default: ''
    label: Expected MD5
    description: >
      If you expect a certain MD5 sum, enter it here. If the determined checksum
      is different from the expected result, the script will exit with an error.
The input key contains a list of input groups. Each group has a key and a label, and min/max file count requirements may be specified. Most importantly, the possible file formats are specified.
File formats are specified in the CLI tools atlas, in include/cli-tools-atlas/formats, here are a couple of file formats:
- any.yaml
- csv.yaml
- fasta.yaml
- html.yaml
- mgf.yaml
- txt.yaml
- xhtml.yaml
- xml-mzml.yaml
- xml-mzml-compressed.yaml
File formats are specified via their key, as defined by the filename. In order to use CSV files as input files, csv must be specified. Let’s look into csv.yaml:
extensions: ['.csv']
description: Comma separated values
Several filename extensions are possible for a file format. This information is used by Proteomatic to assign input files to input groups based on their filename extension. If you need to add file formats here, just add them to your local directory, they will be available in Proteomatic. If you would like to share your contribution, please add your work to the CLI tools atlas.
For the label, use lowercase words except where it’s required: ‘input’, ‘database’, ‘entries’, ‘FASTA database’ are good. In some places, Proteomatic will capitalize the first letter of the label, and sometimes it is used in a sentence.
Output files
If you want your script to produce output files, put the output key into the description:
group: Proteomics/Miscellaneous

title: Tryptic protein digestion

description: >
  Digest a protein into tryptic peptides,
  allowing for missed cleavages.

type: processor

input:
  - key: sequences
    format: fasta
    label: FASTA database

output:
  - key: results
    format: txt
    filename: tryptic-peptides.txt
    label: tryptic peptides

defaultOutputDirectory: sequences

proposePrefix:
  - sequences

parameters:
  - key: protein
    type: string
    label: Protein
    textfield: yes
  - key: mc
    type: int
    label: Missed cleavage sites
    min: 0
    default: 1
  - key: minLength
    type: int
    label: Minimum peptide length
    min: 0
    default: 0
For the label, the same rules apply as to input files: Use lowercase words except where it’s required (e. g. FASTA).
Additional keys regarding output files:
- defaultOutputDirectory
If your script provides output files, you must set
defaultOutputDirectoryto one of your input file groups. If the user does not explicitly specify an output directory, all output files are written to the directory of one of the user-provided input files from the specified group.
- proposePrefix
The filename of output files is fixed but can be prepended with a user-defined prefix.
Proteomatic offers a ‘magic wand’ feature for proposing prefixes based on the input files specified.
By default, the input files of the group defined bydefaultOutputDirectoryare used to propose a prefix. If you want to change this, you can explicitly specify a list of input groups which should be used for prefix proposals.
Converter script output files
With converter scripts, output files must be specified in a different way because for every input file of one group, an output file created. This means that the number of output files is not fixed as it is for processor scripts, but is defined at run time depending on the number of input files provided by the user.
Here is an example:
group: Proteomics/Protein databases

title: Chop FASTA databases

description: >
  Chop FASTA databases into chunks.

type: converter

input:
  - key: databases
    label: FASTA database
    formats: [fasta]

output:
  - key: databases
    label: chopped database
    format: fasta
    filename: "#{basename}-chopped.fasta"
    default: yes

defaultOutputDirectory: databases

parameters:
  - key: windowSize
    type: int
    default: 400
    min: 1
    label: Chunk size
  - key: windowShift
    type: float
    default: 50.0
    suffix: '%'
    decimals: 2
    label: Chunk overlap
    min: 0.0
    max: 100.0
The task of this script is to convert a input FASTA database to a FASTA database which contains fixed-length overlapping subsequences of the input sequences.
The main difference here is that only one output file group is specified and the key is set to the key of the corresponding input file group (the files which should be converted), in this case, database. Because several input files are created, the output filename includes parts of the respective input filename via the #{ } syntax (the Ruby lilypad). The following specifiers are supported:
#{filename}— the complete input filename (‘input.txt’)#{basename}— the input filename up to the first dot (‘input’)#{extension}— the input filename extension (‘.txt’)
Another way to specify the output filename in the above example would be #{basename}-chopped.#{extension}. This would not set the output filename extension to .fasta but would retain the input filename extension, which could also be .fas, .fa, or .faa.
Implementing the script code
Create a file in the Proteomatic scripts base directory with the same filename as the description file, but ending on .rb, .py, or .php instead of .yaml, and chmod +x it to make it executable. Don’t forget to add a shebang like #!/usr/bin/env ruby as the first line.
The basic principle of implementing a Proteomatic script is defining a subclass of ProteomaticScript and implementing the virtual run() method. In this method, three instance variables input, output and param are made available by the underlying framework. Finally, an object called script is instantiated from the class, and everything else is handled by the superclass constructor.
All user-provided information is passed, depending on the language used, in three variables:
paramA dictionary of parameters with keys as specified in the YAML description and their respective values.
inputA dictionary in which input group keys point to a list of input files, which may be empty, depending on the min/max requirements defined in the YAML description.
outputA dictionary in which output group keys point to the complete output filename, including the directory and prefix. If an output file was not requested, the key will not be defined.
Behind the scenes, output filenames are suffixed with
.proteomatic.part, and Proteomatic takes care of renaming output files upon successful completion of the script. This way, broken files will not be considered as valid output files by mistake because they have the suffix.Converter scripts: For converter scripts, the
outputdictionary contains an output filename for every input filename, for example:{'a1.fasta' => 'a1-converted.fasta', 'b2.fasta' => 'b2-converted.fasta'}.
The following example are different implementations of the same script (Transpose DNA).
Ruby
In Ruby, all neceassary information is passed via the instance variables @param, @input and @output. For keys, Ruby symbols instead of strings are used.
#! /usr/bin/env ruby

require './include/ruby/proteomatic'

class TransposeDna < ProteomaticScript
    def run()
        # convert all characters to upper case
        dna = @param[:nucleotides].upcase
        # remove invalid characters
        dna.gsub!(/[^CGAT]/, '')
        # reverse sequence
        dna.reverse!
        # replace nucleotides with
        dna.tr!('ACGT', 'TGCA')
        # output transposed DNA
        puts dna
        File::open(@output[:result], 'w') { |f| f.puts dna } if @output[:result]
    end
end

script = TransposeDna.new
Python
In Python, all neceassary information is passed via the instance variables self.param, self.input and self.output.
#! /usr/bin/env python

import sys, os
sys.path.append('./include/python')
import proteomatic
import string
import re

class TransposeDna(proteomatic.ProteomaticScript):
    def run(self):
        # convert all characters to upper case
        # Attention: parameters are Unicode because of the JSON parser
        # used behind the scenes, convert nucleotides to ASCII string
        dna = str(self.param['nucleotides']).upper()
        # remove invalid characters
        dna = re.sub('[^ACGT]', '', dna)
        # reverse sequence
        dna = dna[::-1]
        # replace nucleotides
        dna = dna.translate(string.maketrans('ACGT', 'TGCA'))
        # output transposed DNA
        print(dna)

        if 'result' in self.output:
            with open(self.output['result'], 'w') as f:
                f.write(dna + "\n")

if __name__ == '__main__':
    script = TransposeDna()
PHP
In PHP, all neceassary information is passed via the instance variables $this->param, $this->input and $this->output.
#! /usr/bin/env php
<?php

require_once ('include/php/proteomatic.php');

class TransposeDna extends ProteomaticScript
{
    function run()
    {
        // convert all characters to upper case
        $dna = strtoupper($this->param->nucleotides);
        // remove invalid characters
        $dna = preg_replace('/[^CGAT]/', '', $dna);
        // reverse sequence
        $dna = strrev($dna);
        // replace nucleotides
        $dna = strtr($dna, 'ACGT', 'TGCA');
        // output transposed DNA
        print($dna."\n");
        if (isset($this->output->result))
        {
            $f = fopen($this->output->result, 'w');
            fprintf($f, $dna."\n");
            fclose($f);
        }
    }
}

$script = new TransposeDna();
?>
Development tips
Configuration file
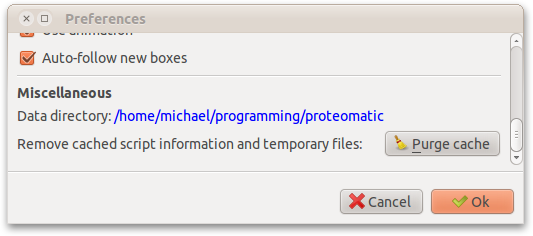
Before your scripts show up in the Proteomatic scripts menu, you have to tell Proteomatic where to look for your scripts. This information is stored in the configuration file proteomatic.conf.yaml. This file is stored in the Proteomatic data directory which is usually ~/.proteomatic, or, if you use a portable version, the program’s directory.
To determine the actual data directory, you may open the Preferences dialog (Ctrl+P), the data directory is shown in blue.
In the configuration file, you may specify additional scripts paths via the additionalScriptsPaths variable:
additionalScriptsPaths:
  - /home/michael/my-scripts/proteomatic-scripts
If you wish to move the managed scripts packages out of the way, you may rename or remove the scripts directory in the data directory. In addition, disable automatic script updates to prevent the managed scripts from re-appearing. Re-enabling the updates at a later time will re-create the scripts directory and everything will work as before.
Reloading scripts
If your script does not appear in the script menu or if you would like it to appear in another submenu, press Ctrl+R to reload the scripts menu. Because Proteomatic caches information to gain speed, it is usually necessary to also touch the script file when only the description has been changed (The modification timestamp of the script file is used to determine whether the cached information needs to be updated).
If your script is already depicted as a script box on the canvas, changes to the code take immediate effect because the script is simply called by the GUI. However, in order to reflect parameter changes which affect the GUI, it is necessary to reload the script from the scripts menu.
Troubleshooting
If your script does not appear in the scripts menu, run it from the command line. When Proteomatic builds the script menu (press Ctrl+R to force a rebuild), it calls every script with ---yamlInfo --short, unless the information in the cache is still valid. Try to run your script with ---yamlInfo --short from the command line and see what happens.
When a script is picked from the scripts menu, Proteomatic calls the script with ---yamlInfo to receive all information, including parameters.
If there is information missing in the script’s YAML description, the script will exit with an error and Proteomatic will silently skip the script. When called from the command line, the output messages show what went wrong.