Adding Your Own Module
In the following, we describe step by step how to create a new module named sample, which contains a simple processor perfoming text editing and a simple image processor performing a gray scale conversion using a GLSL fragment shader. All files used in this paragraph can be found in the "SampleModule" in the actual Voreen release.
0. Generate the Module Directory
In our example, we create a subdirectory sample in the modules directory, where all released modules are located. Self developed modules should normally be located in the custommodules directory for a better differentiation between original and own modules.
1. Add the Code Files
 Then we add all code files that should be included in the module. In our example, these are the two processor headers (sampleprocssor.h/samplerenderprocessor.h) and source files (sampleprocssor.cpp/samplerenderprocessor.cpp), which we put in a subdirectory processors, as well as the fragment shader (sample.frag), which we put in a subdirectory glsl. The structure of our module directory now looks like the tree structure on the right side.
2. Write the Module Class
Now we create our SampleModule class that is responsible for registering the module's resources at run time. In general, three requirements have to be met:
- The module class must be derived from the VoreenModule base class.
- The file names of the module classes's header and source files have to correspond to the name of the module class in lower case, e.g., SampleModule => samplemodule.h / samplemodule.cpp
- The module classes's header and source files have to be located at the root level of the module directory.
modules/sample/samplemodule.h:
|
#ifndef VRN_SAMPLEMODULE_H
#define VRN_SAMPLEMODULE_H
//include module base class
#include "voreen/core/voreenmodule.h"
//use namespace voreen
namespace voreen {
/**
* Each Module has to inherit from VoreenModule.
*/
class SampleModule : public VoreenModule {
public:
/**
* Constructor of the module.
* @param modulePath the path to the module
*/
SampleModule(const std::string& modulePath);
/**
* Sets the description to be shown in the VoreenVE GUI.
*/
virtual std::string getDescription() const;
};
} // namespace
#endif //VRN_SAMPLEMODULE_H
|
modules/sample/samplemodule.cpp:
|
//incude header file
#include "samplemodule.h"
// include classes to be registered
#include "processors/sampleprocessor.h"
#include "processors/samplerenderprocessor.h"
//use voreen namespace
namespace voreen {
SampleModule::SampleModule(const std::string& modulePath)
: VoreenModule(modulePath)
{
// module name to be used internally
setID("Sample Module");
// module name to be used in the GUI
setGuiName("Sample Module");
// each module processor needs to be registered
registerProcessor(new SampleProcessor());
registerProcessor(new SampleRenderProcessor());
// adds a glsl dir to the shader search path (if shaders are needed in the module)
addShaderPath(getModulePath("glsl"));
}
std::string SampleModule::getDescription() const {
return "My first sample module.";
}
} // namespace
|

3. Write the CMake File
In order to integrate the module's code files into the build process, we have to add a CMake file that specifies the name of the module class and references the code files. This CMake file has to be named <moduledir>.cmake, e.g., sample.cmake in our case. It has to be put at the root level of the module directory. The final structure of our module directory should now look like the tree on the right side.
modules/sample/sample.cmake:
|
# module class must reside in sample/samplemodule.h + sample/samplemodule.cpp
SET(MOD_CORE_MODULECLASS SampleModule)
# module's core source files, path relative to module dir
SET(MOD_CORE_SOURCES
${MOD_DIR}/processors/sampleprocessor.cpp
${MOD_DIR}/processors/samplerenderprocessor.cpp
)
# module's core header files, path relative to module dir
SET(MOD_CORE_HEADERS
${MOD_DIR}/processors/sampleprocessor.h
${MOD_DIR}/processors/samplerenderprocessor.h
)
|
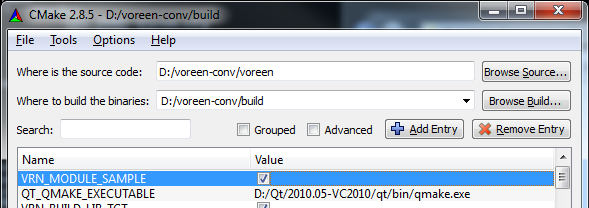
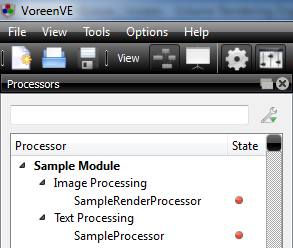
4. Activate the Module and Rebuild the Project
When running CMake configure, Voreen automatically detects the new module and presents a corresponding build option, which is named after the module dir. Just activate the module, re-configure, re-generate the project and build it. For advice on the build process itself, please refer to the build instructions. After the rebuild, the SampleProcessor and SampleRenderProcessor should be available in the VoreenVE application.