© CIT

Antivirus - Software

Information: Every end device - both work and private - should be equipped with antivirus software for your own security and the security of the university network.

Office devices will be equipped with the appropriate software by your IVV or your responsible administrator.

For private end devices, the free offer for Sophos Home ends on 01.10.2024 and will not be continued. Unfortunately, the University of Münster can no longer provide antivirus software. Please take care of antivirus protection for your end devices in good time.

The following instructions explain the software installation procedure using examples, which you can install as software/app on your end devices.

  • Windows Defender

    Windows Defender is the integrated antivirus and security program in Windows.

    This guide will help you to get Windows Defender up and running correctly.

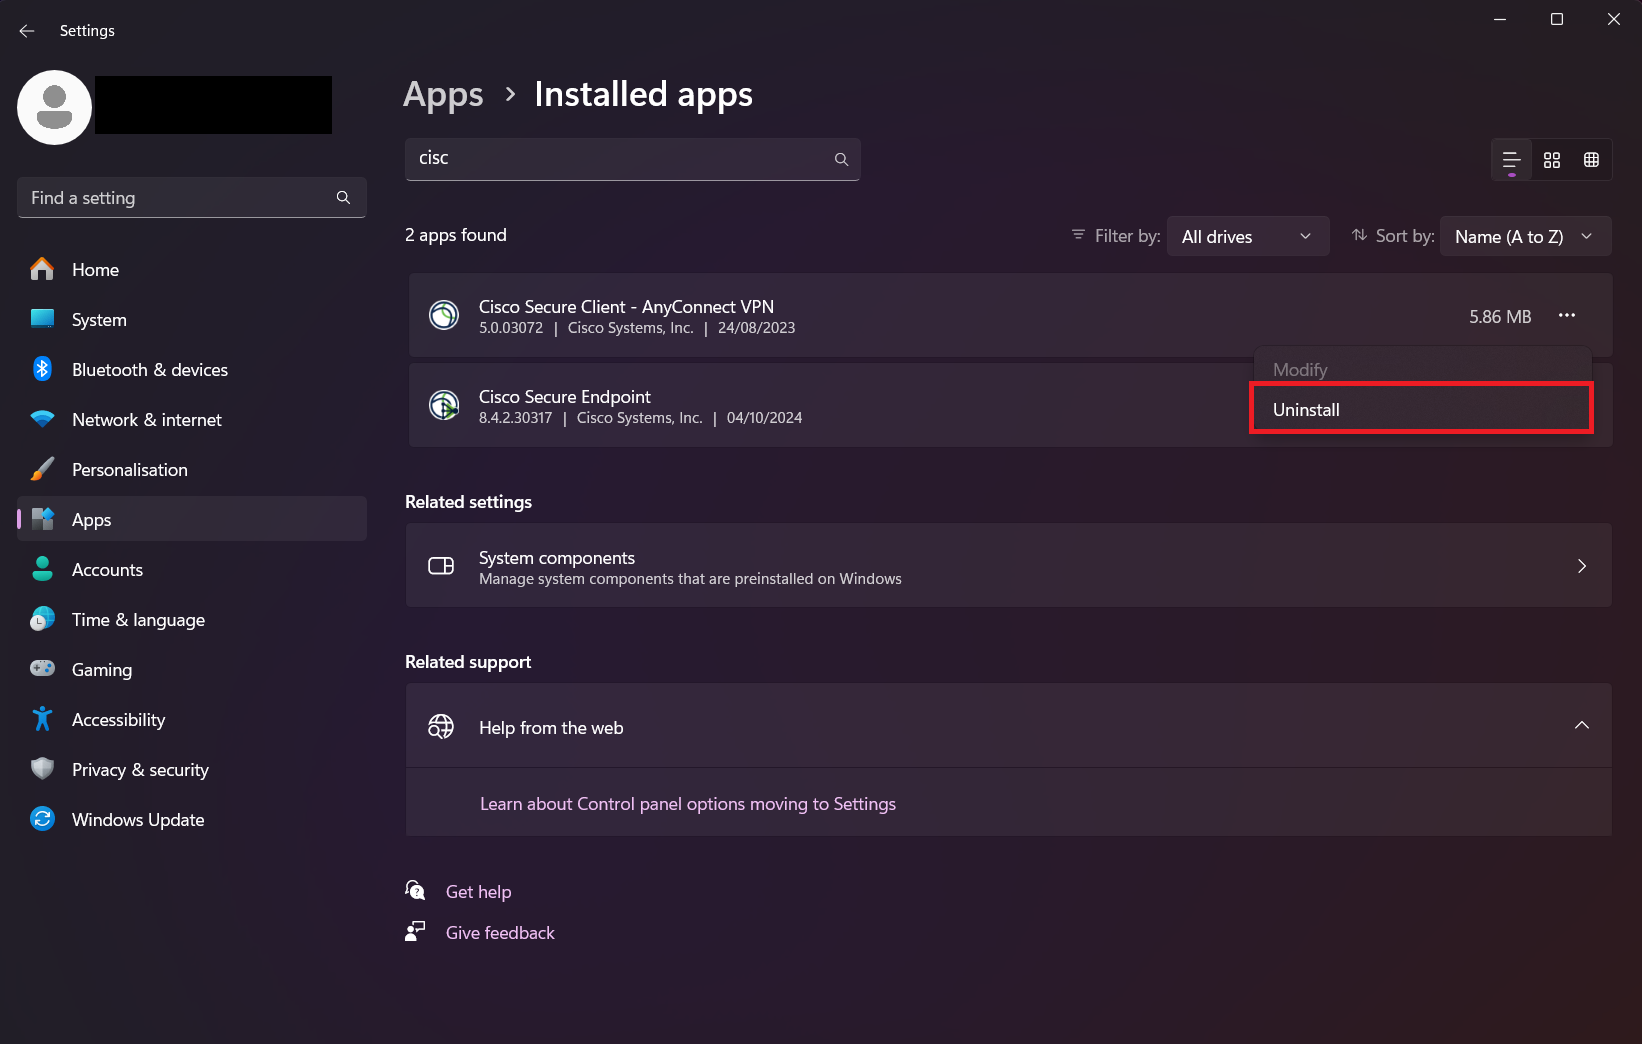
    1. Uninstall Previous Antivirus Program

    Press the Windows key and I to open the settings.
    In the settings, navigate to Apps -> Apps & features.
    Search for the previous antivirus program (e.g. Sophos)
    Click on the program and select the “Uninstall” option.
    Restart your computer once after uninstalling.
     

    1. Uninstall Previous Antivirus Program
    © CIT

    2. Open Windows Defender

    Press the Windows key and enter “Windows Security” in the search bar.
    From the search results, open the “Windows Security” program (a blue shield icon).


    2. Open Windows Defender
    © CIT

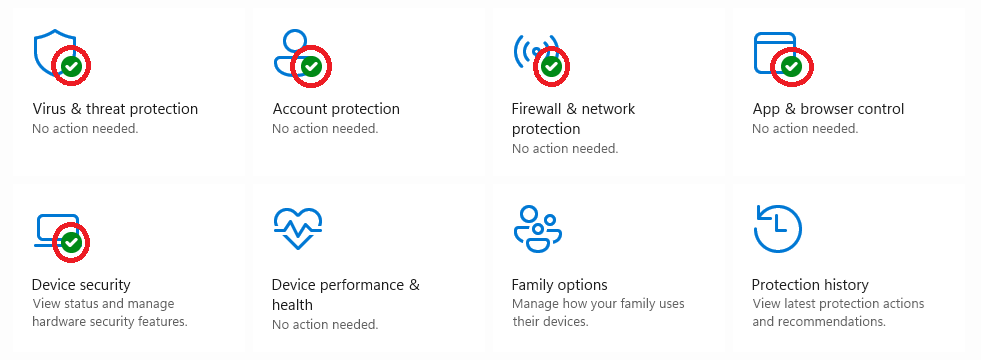
    3. Activate Windows Defender

    Navigate to the “Virus & threat protection” item in the program.
    Activate the real-time protection.
    If all checkboxes are activated, you have successfully put Windows Defender into operation.

    3. Activate Windows Defender
    © CIT
  • Installation manual for Linux (ClamAV)

    •     It is recommended that you regularly check your home folder manually.
    •     If you are unsure about downloaded files, it is better to play it safe and check the file.

    Further information:

        Arch-Linux-Wiki (the instructions are also very detailed regardless of the distribution)
        Official documentation of ClamAV
        Ubunuusers-Wiki (German language)

    If you have any questions, please contact the IT user support.

    1. Installation of the antivirus software

    Installing the antivirus programme:

    We recommend installing the programme together with a graphical user interface. To do this, please install the clamtk package. You can either install this yourself via the software administration or use one of the command line commands listed here, depending on your distribution:

    Ubuntu/Debian and their derivatives: sudo apt-get install clamtk
    Fedora/RHEL and their derivatives:  sudo dnf install clamtk
    Arch/Manjaro and their derivatives: sudo pacman -Syu clamtk

    (Please only execute the command that matches your operating system. The other commands will not work).

    2. Update of the Virus-Database

    Once the installation is complete, we update the virus files manually:
    sudo systemctl start clamav-daemon.service && sudo systemctl enable clamav-daemon.service

    3. start/add service for background monitoring

    Now start the background programme that continuously checks your PC for threats:
    sudo systemctl start clamav-freshclam.service && sudo systemctl enable clamav-freshclam.service  

    4. background update

    Now we add the service for updating the virus database to the system (which you initially did manually in step 2) so that this database is updated regularly for your security and start it:
    sudo systemctl start clamav-freshclam.service && sudo systemctl enable clamav-freshclam.service  

    5. start the ClamTK programm

    Please start the ClamTK programm now.

    5. start the ClamTK programm
    © CIT

    6. Final change of the settings

    Please adjust the settings so that the ticks shown in the screenshot have been set.
    In particular:

    • "Check for potentially unwanted programms" - programms that have been hidden and installed by other programmes
    • Scan files with a leading dot (.*) - also checks files that are otherwise displayed as hidden by the system
    • Search folders recursively - also checks subfolders of folders
    • Check for updates for this programm
    Now you can use ClamTK or ClamAV.

    6. Final change of the settings
    © CIT

    7. Note regarding scanning

    When starting the scanning or during the process, this notification can pop up. This is not an issue, you just have to wait a few seconds.

    7. Note regarding scanning
    © CIT