Tips for creating PDF files
General information on the PDF format
The Portable Document Format (PDF) is a file format that allows files from numerous applications (word processing, graphics, etc.) to be displayed on different computers, even with different operating systems, always in the same layout as the original file. In addition, to view PDF files, regardless of the text or desktop publishing programme from which they were created, you do not need the software with which the file was created, but only a ‘viewer’ such as Adobe Reader. This is why PDF is now the standard for exchanging digital documents.
Preparing the document for PDF creation
In order to generate a PDF file from the word processing file of your work, it is strongly recommended that the PDF file is created on the computer on which the work was written, if possible. On other computers or monitors, the layout of the work may be displayed differently, page breaks or graphics and tables may ‘slip’! In the worst case scenario, the table of contents may no longer be correct afterwards.
It is therefore best to set up the PDF programme as a printer on your computer to create the PDF file. If necessary – or if you have to use a different computer – the layout of the document can be ‘hard’ adjusted before the PDF file is created:
- Paragraph and page breaks: You can customise the layout using ‘forced page breaks’; inserting blank lines generally does not achieve the desired result.
- Colour management for illustrations, diagrams etc.: Graphics should be in CMYK mode for book printing and not in RGB mode. The entire document can be converted to CMYK at the latest when the PDF file is generated. There are corresponding setting options in the PDF programmes for this purpose.
Programmes for PDF creation
If you have the possibility to use the Acrobat Professional programme at the University this is recommended in the first place, as the presetting required for the publication series can mainly be made there without any problems (see below). Employees of the University of Münster can also obtain this software from the responsible IVV of the department: https://www.uni-muenster.de/IT/services/arbeitsplatz/software/adobe-acrobat-pro.html.
There are now also various free programmes that you can use or download from the Internet. FreePDF, PDF24 or PDFCreator, for example, are well suited for generating PDF files from word processing programmes such as Microsoft Word.
Some word processing programmes, e.g. LaTex, already have a convenient PDF export module integrated, in which the required settings may still need to be adjusted.
Typesetting programmes such as Adobe InDesign or QuarkXpress generally have a PDF export function.
Default settings for PDF export
In order for a work to be converted into a high-quality PDF file suitable for book printing, certain specifications must be observed and selected or adjusted in the programme you are using.
- Set the quality standard: For the PDF export, select the best possible quality for print products in the programme with which you want to create the PDF file, e.g. ‘high-quality print’, ‘PrePress’ or ‘High Quality’. These profiles are named differently depending on the programme and version. A selection must be made depending on the printer under ‘Properties’.
PDF export functions implemented in word processing software such as OpenOffice or LibreOffice usually offer only a few customisation options and are not suitable for high-quality print publications. In this case, please use an external PDF programme. - Embedding fonts: Fonts must always be ‘embedded’ when creating a PDF so that a text is displayed and printed in the font of the ‘word processing original’, even if the reader does not have this font installed. The fonts as such must therefore also be saved in the PDF file. How fonts are integrated also depends on the programme from which the PDF file is generated.
- Security settings and passwords: To ensure that PDF files remain permanently readable even when Adobe products (PDF readers) are versioned, all security settings are not permitted. You should check that everything is ‘permitted’ under ‘File/Properties’.
Creating the PDF print file
After selecting the above default settings, use the ‘Print’ command to print the PDF file, which you can save under a descriptive file name when prompted by the software. The PDF generation process takes a while!
An example with screenshots for creating a PDF file from the word processing programme MS Word 2003 and from MS Word 2007 with the software Adobe Acrobat Professional can be found in the appendix.
Merging several PDF files into one print file
If several PDF files have been created, e.g. if there are document parts with different page numbers or without pagination, these should be combined into a single file using the ‘Insert document/pages’ command.
A new PDF must then be created. Only then will all fonts remain embedded and the colour management retained, so that a high-quality PDF file is available for book printing.
Service
If you have any questions, please contact the ULB Publishing Service Centre
- Phone: +49 (0)251 83-25529
- E-mail: schriften@uni-muenster.de
Create PDF print file from Microsoft Word 2003 (and higher) with Acrobat Pro
General information
These brief instructions describe how to create a printable PDF file from Microsoft Word 2003 or Microsoft Word 2007 with Adobe Acrobat Professional 9.0 according to the specifications required for printing the University's publication series. The instructions can also be used for older versions of Word or Acrobat Pro.
Creating the PDF file from Microsoft Word
The PDF file must be created using the ‘Print’ command in the programme, not using the printer icon or the ‘Acrobat icon’ in the menu bar. Only then can you adjust the settings for the print file.
- MS Word 2003: Select the menu item ‘File / Print’.
- MS Word 2007: Select the ‘Office’ button at the top left and then ‘Print’
- MS Word 2010: Select the menu item ‘File / Print’
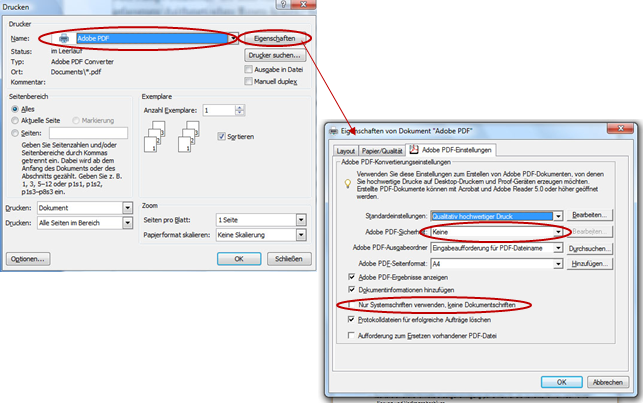
The printer menu window opens. First select ‘Adobe PDF’ as the printer driver:

Next, open the ‘(Printer) Properties’ menu. There you select
- under ‘Default settings’ in the drop-down menu ‘High quality printing’
- and remove the tick next to ‘Only use system fonts, no document fonts’
Click on ‘ok’ to confirm these default settings twice, then create the PDF file with the ‘Print’ command and save the file.


